Glitter Graffiti Jeans

Tuesday, December 29, 2009

Peace, Love, and Glitter! This is a great project for a group of girls. Just give them a flat space to lay out their jeans, and bottles of Sparkle 21. Make sure they can leave their masterpieces lying flat overnight.


Reasons you will love Sparkle 21:
  • - the sparkle and the color are amazing
  • - it is washable, not kidding, it can go in the washing machine
  • - it will stick to every surface
  • - it permanently holds gems and sequins
  • - the bottle has a nice thin tip for drawing and writing
Girls are natural doodlers, they will have a great time drawing and doodling on their jeans. Click on my pics below to get a better look at my graffiti jeans. It will give you some ideas for doodling.


No patterns needed, just draw!

Glitter on,
Sparkle

Peace Sign Jeans

Monday, December 28, 2009

This is the first in a series I am working on called Mod Girl. It is going to be really Retro 70s..... lots of peace signs and flower power. I think girls of any age will enjoy these designs. Aren't these jeans totally groovy? Hope you enjoy! To make these jeans,


You Need:
  • a pair of jeans
  • Sparkle 21: Night Sparkle, Very Berry Sparkle, Blue Suede Sparkle
  • light color chalk pencil
  • the patterns
Try this:
1. Print out the patterns and make them the size you wish.
2. Trace the pattern lines with chalk pencil. Lay chalk side down on pantleg. Rub on backside of paper to transfer the lines to denim. Transfer as many as you want on the pantleg. I made all round peace signs with one heart peace sign.

3. Trace the pattern lines with Night Sparkle. Lay flat and let dry.
4. Fill in the round peace signs with Blue Suede Sparkle and the heart peace sign with Very Berry Sparkle. Lay flat, allow to dry before wearing.

As usual, adapt the pattern size to fit your garment. You may also change the Sparkle 21 colors to suit you. Use your favorite colors. Think about making this design your own. Place it on a shirt sleeve, or up the leg of a tall pair of boots instead of a pantleg.

Stay tuned for more Retro fun,
Glitter on!
Sparkle

One More Last Minute Christmas Glittering!

Tuesday, December 22, 2009

There are just a couple days until Christmas 2009, and you probably already have all of your decorating done, all your baking done, all your presents bought and wrapped to perfection, and you are sitting with your feet up drinking a cup of tea and watching TV. Yeah, that made me laugh too. So, if you are in need of a last minute project, this would work for decorating, or as a package topper, or a gift.


I went to the craft store yesterday and noticed Christmas items are 50%-70% off. So, now is the time to find some really inexpensive silk poinsettias. Even if they are sad looking, you will fix them up from sad to happy.

These pre-glittered poinsettias were $9.99 each. They are beautiful, yes, but you can do the same on your sale poinsettias for much much less. Notice what they did:
- outlined some leaves with glue and glitter
- covered some petals with glue and glitter
- covered the centers with glitter

Use glitter in the same color for a subtle look, or,

use glitter in a contrasting color that will stand out visually.

This is a small poinsettia. It came on a bush, so was even more cost effective. The very creative ladies who put on a banquet at church this month, made one of these for each attendee. See that they outlined some of the petals and added a few gems. They turned it into a pin. Beautiful. I have gotten many compliments on mine when worn.

Glitter on!
Sparkle

Glittery Candy Cane Mice

Saturday, December 19, 2009

This is an old kid's craft. You have probably seen these cute candy cane holders. They are a fun last minute Christmas project requiring some craft foam and glitter glue. I made mine in two sizes, and added glitter glue. The smaller candy cane mouse is a pin. You or your kids will have fun making these.


You need:
  • craft foam, your color choice
  • glitter glue: pink, opal, black
  • 2 wiggle eyes
  • pencil, scissors
  • 8" of ribbon
  • pin back and white craft glue (optional)
Try this:
1. Trace and cut out a mouse and an ears pattern.
2. Fold the wide end of the mouse body over. Using scissors, cut two slits in the fold. The ears will attach in these slits.
3. Unfold the mouse body. Slide the ears into the slits, so the ears are on top of the mouse body.
4. Glitter the ears and body as desired. I made white ears with pink centers. Let dry.
5. Use opal glitter glue to glue wiggle eyes in place.
6. Add a dot of black for nose. Let dry.
7. Tie a bow around the candy cane. The candy cane fits into the strap on the back that is formed by the ear piece.
8. If you are making a small mouse, glue a pin back to the back of the mouse.


patterns, small and large mice:
Merry Christmouse and Glitter on!
Sparkle

Sparkly Ornaments for Kids to Make

Thursday, December 17, 2009

Kids of all ages! I had fun working on these, myself. Even so, they are simple enough for kids to make.


You need:
  • Big & Glitzy Glitter Glue: whatever colors you like
  • blank stencil material (or any kind of clear plastic)
  • dimensional fabric paint: silver metallic (gold would be pretty, too)
  • Sparkle gems: colors and shapes of your choice
  • scissors
  • wire or ornament hangers

  • these patterns...or draw your own...you just need simple line drawings. Print them out and make them any size on your copy machine.


Try this:
1. Lay the patterns under the stencil blank. Using dimensional paint, trace the lines of the patterns on the plastic. Let dry.

2. Fill the shape with Big & Glitzy. The thicker the glitter glue, the more sparkle when dry.

3. Set gems into Big & Glitzy while wet.

4. When Big & Glitzy is dry, cut shapes out.

5. Use a small hole punch or a small nail to make a hole at the top of each ornament. Use a piece of wire or an ornament hanger to hang the ornament on the tree.

Wouldn't it be gorgeous to hang a bunch of snowflakes in the window? Make some silver, some blue and some white. They can stay up until spring.

Glitter on Kids!
Sparkle

It's a Hot Pink Christmas

Tuesday, December 15, 2009

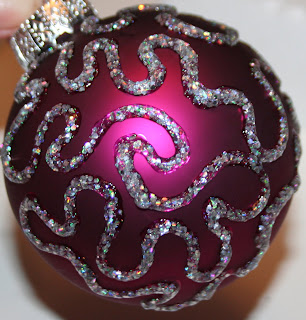
While not exactly traditional, these hot pink ornaments are merry. Add some Big & Glitzy Glitter Glue and Fashion Sequins, and they are merry and fabulous! They were very easy to make. For some helpful tips on working with Big & Glitzy, check out the Craft Sisters' video.


To make your own fabulously merry ornaments, you need:


  • Big & Glitzy....I used Peridot, Garnet, and Sterling

  • Round glass ornaments...I found hot pink in matte and shiny
  • Fashion Sequins.... I used the pink, silver, green mix
Try this:

1. On a matte finish ornament, using Sterling Big & Glitzy, draw squiggles.

2. Set the smallest size sequins randomly in the glitter glue while wet.

3. On a shiny ornament, apply dots of Peridot Big & Glitzy. Set the largest size silver sequins in the Big Glitzy while wet.

4. Squeeze out Sterling Big & Glitzy to cover top half of matte finish ornament. Set all sizes of sequins in the Big & Glitzy while wet.

5. Add a row of large size sequins underneath.

6. On shiny ornament, make vertical rows of Garnet Big & Glitzy dots. Set medium sized sequins in the Big & Glitzy while wet.

Change the colors of the ornaments, glitter glue, and sequins as you wish. Experiment with your own designs. Turn on a Christmas movie and get to work!

Glitter on!
Sparkle

The Essential Holiday Earrings

Monday, December 14, 2009

Jingle Bell Earrings! Covered in glitter. Yeah, you know you want some. They are perfect for holiday parties. And will take you five minutes to make.


While you are at it, you might want to make a glittered jingle bell wreath ornament. I will show you how.

You Need:
  • jingle bells (This 2 1/2" wreath ornament took 15 red bells. Choose any color bells. Glittering more than 15 will make your wreath larger.)
  • fine glitter of the same color as the bells
  • white craft glue
  • craft wire
  • small flat paintbrush
  • ribbon to make a bow
  • toothpicks, one for each bell
Try this:
1. Place each bell on a toothpick.

2. Holding the toothpick, use the paintbrush to brush glue all over a bell.

3. Sprinkle glitter over the wet glue. Shake off the excess. Set the bell down to dry. Repeat for all bells.

4. When all bells are dry, string on a piece of wire. Twist the ends together. Form a hanging loop above the twist.

5. Wire a bow to the top of the wreath.

To make the essential party earrings, glitter two bells the same way. Use jump rings to attach them to earring findings.

If the jingle of the bells right below your ears will drive you around the bend, then when brushing glue on the bells, add a little inside the bell. The little ball will be glued down and not jingle. You get the jingle bell look without the jingle bell sound!

Make a pair of earrings for each of your friends. They will love you and your creativity!

Glitter on,
Sparkle

Glitter Gift Bags

Friday, December 11, 2009

In need of a holiday gift bag? These bags can be made literally in minutes. You can buy inexpensive blank bags in holiday colors. Then just add glitter or glitter glue in these fast and easy designs. No patterns to trace, just draw. It's just doodling! They are so easy, kids can make them, too.


You need:
  • red gift bag
  • craft glitter: gold, silver
  • white craft glue
Try this:
1. Squeezing glue straight from bottle, draw three spirals. Sprinkle gold glitter on while glue is wet.
2. Draw a small rectangle on top of each ornament and a string going straight up. Sprinkle silver glitter on while glue is wet.
3. Lay flat to dry.

You need:
  • blue gift bag
  • fine silver glitter
  • white craft glue
  • straight pin
Try this:
1. Draw two or three big snowflakes. Sprinkle glitter on while glue is wet.
2. Squeeze out a dot of glue about the size of a pea. Draw the pin through the glue to form a small star. Sprinkle glitter on. Repeat as many times as you want stars.
3. Add a few dots in the background. Lay flat to dry.

Stars can be make with a + on top of an X. Add dots at the ends.

You need:
Try this:
1. Draw a big squiggle tree on front of bag. Add red dots for ornaments.
2. Add a gold star and a gold squiggle trunk.
3. Lay flat to dry.

Really, glitter over glue, and Glitter Glue can be interchanged as you wish. Both are sparkly, especially if you are using Big & Glitzy!

Personalize your gift bag designs by changing colors or combining designs.

Glitter on!
Sparkle


Curly Toes Christmas Stocking Pins

Wednesday, December 2, 2009

This week I made 30 of these curly toe Christmas stockings. They are 5 inches tall and have pin backs on the back. They are inexpensive and easy to make. I am giving them as thank you gifts to some amazing women. Don't you think they will make cute lapel pins?


They are cut out of felt and glued together. I made all 30 in three evenings of watching TV. The first night I cut them out. The second night I glued them together. And the third night I glittered. You will find the pattern below, try making a couple!

You need:
  • 2 colors of felt
  • fine glitter (I used my Sample Pack of Glitter and had several colors to choose)
  • white craft glue
  • 3 round Sparkle gems ( any color, notice the green stocking has green gems?)
  • black marker
  • scissors
  • small flat paintbrush
  • pin back
Try this:
1. Cut out pattern. Trace two each on felt. Cut out.
2. Glue together. Two layers will give your stocking a better thickness.
3. Paint glue on the heel of the stocking, and down the front of the boot so it looks like a placket.
4. Set three gems into placket.
5. Sprinkle glitter to cover all wet glue. Let dry.
6. Glue pin back to top back of stocking.


Wouldn't they be cute in bright colors too?
Glitter on!
Sparkle

Related Posts with Thumbnails