The Winner!

Tuesday, June 29, 2010


I had the BEST time reading your ideas on what needs glitter for my birthday contest. I really pondered this for days because it was so hard to choose a winner. You are all very creative and I so appreciate that.


That all said, to receive a box of glitter, I have chosen:

sammjoshua2415 said...

I would probably glitterize my elliptical and treadmill............I may actually want to use them if they were sparkly, lol.

sammjoshua2415, you made me laugh and also wonder if that would help me get on my own treadmill. Please let me know if it works for you! Email me your address so I can send you some glitter!! sparklstudio@aol.com

Glitter on!

Sparkle

Sparkle's New Sew Bandana Pillow

Thursday, June 24, 2010

Check out my guest post on ThinkCrafts! You can make a cute pillow with two bandanas and no sewing.


Glitter on!
Sparkle

Helen's Glitter and Button Flower Pots

Wednesday, June 23, 2010

Look at these really cute post it note holders that my friend Helen made for us today. Helen works for Blumenthal Lansing and I am visiting her this week in New Jersey. Here is Helen to tell you how to make them:


You need:
  • Creatology flower die cuts (get these at Michaels and they come in other flower shapes too)
  • scrapbook paper
  • ribbon
  • fine glitter, color of your choice
  • Mod Podge
  • flat paintbrush
  • glue of your choice
  • acrylic paint: color of your choice
  • small post it note
  • pencil
  • scissors
To make it:
1. Lay the die cut on the paper and trace the pot. Cut it out.
2. Paint flower and stem. Let dry.
3. Use glue or Mod Podge to adhere the paper to the pot.
4. Glue a piece of ribbon to trim the pot.
5. Brush a coat of Mod Podge on the flower head. While it is wet, sprinkle glitter over it. Shake off excess and recycle it.
6. Glue buttons across ribbon trim and wherever you like on the flower. You can layer some buttons or glue them individually.

7. Place the post it note pad where you like it.

You could add a magnet to the back and put it on the fridge, or sit it on your desk, or attach two together to make a card, or glue it to the front of your notebook to keep yourself organized. Be creative, I bet you can think up many good ideas for this cute project!

My thanks to Helen. Don't you just love cute button projects??
Glitter on!
Sparkle

Birthday Give Away


I am having a terrific birthday today. So many of my friends are sending wishes and virtual presents and links to their artwork. It is very touching and lots of fun.

My friends a Blumenthal Lansing, who make buttons that you have to have the minute you see them, invited me for a visit this week. And they threw me a birthday party this morning, complete with glittery cookies, brownies and a sparkly birthday card.

Not wanting to have all the fun for myself, I am having a give away! I am packing a birthday box of glittery fun. The specific item list will be a surprise. Just like a birthday present. But, you will like it. Just like a birthday present!

To enter, just leave me a comment below describing to me an item in your house or office right now that needs glittering. The most creative answer wins!

Happy Birthday to me and Glitter on!
Sparkle

Butterflies

Tuesday, June 15, 2010

Glitter some pre-made butterflies for a fast and easy accent to use as home or party decor. You need:


  • pre-made butterflies ( I bought these at Michaels in the floral department, they have metal clips on the back)
  • Glitter glue, chose your colors: I used silver and black magic
  • heavy aluminum wire (I also got this in the floral department, it is easy to bend, and holds its shape well)
Try this:
1. Cut a yard of wire. Measure from one end the height you want your butterfly to be from the table. Mine was 8". So, I measured 8" from one end and wrapped the wire around my finger.
2. Continue to wind the wire into a spiral.

3. Use glitter glue to accent the butterfly. Follow the design already there, or do your own thing. Add dots or stripes for accents. Let dry. Clip to the top of the wire.

Several of these would make a pretty centerpiece for a party.

Glitter on!
Sparkle

Froggie Flip Flops Kid's Craft

Monday, June 14, 2010

Froggies on the playground, the park, the beach, the pool. These froggies are suitable for any summer day. Make some with your kids, they are easy to do. You need:

  • Glitter glue: Black Magic
  • Fun foam: green
  • 2 20mm wiggle eyes
  • 6” black chenille stem
  • 1/16” hole punch
  • printed pattern
  • scissors
  • pencil

Try this:

1. Cut out frog pattern. Trace onto green foam, cut out.

2. Glue eyes on top of frog. Outline and add a silly mouth. Let dry.

3. Punch two holes in center of frog face, where the nose would be, about 1/2” apart. Put ends of chenille stem through holes. Wrap to center of flip flop. Twist ends of chenille stem together, making sure ends are tucked under frog.

4. Repeat for other flip flop

Glitter on!

Sparkle

Glittery Backpack Tags Kid's Craft

Tuesday, June 8, 2010

Backpacks are more fun when they aren't carrying school books. For summer, they might be going to camp, to dance class, to the pool or park. Make backpack tags with fun shapes, colors, names, or fun reminders of summertime.


You need:

  • Fun Foam
  • Glitter Glue
  • Busy Kid’s Camp Tropical Silky Cord
  • Hole punch
  • Pencil
  • Scissors
Try this:
1. Cut foam pieces of your choice, glue together.
2. Punch a hole and tie cord hanger in it.
3. Decorate and write words with glitter glue. Let dry.

Make your backpack tags to match summer activities. Everyone else will be so jealous!

Glitter on!
Sparkle

1.

Glittery Pinwheels Kid's Craft

Monday, June 7, 2010

Pinwheels are so easy to make. You can use them as a toy, a party decoration, you could even use them as a cake topper. Glitter them in colors and patterns as you like.


You need (for each):

  • 7” square fun foam
  • glitter glue colors of choice
  • scissors
  • pencil with eraser
  • quilt pin
  • ruler
Try this:

1. Using glitter glue, draw design on fun foam square as desired. Let dry.

2. Measure and mark center point. Use scissors to cut from each corner into the center, stopping about an inch away from the mark

3. Fold the point of each section to the center mark. Stick the quilt pin through the four corners at the center of the pinwheel, and into the pencil eraser. You could also build it on a drinking straw or a dowel rod.

Fold your pinwheels with the painted side up or the painted side down.

Line your sidewalks with these for the summer holidays. Fun!
Glitter on!
Sparkle
Glittery Tie Dye Pendants Kid's Craft

Friday, June 4, 2010


Stock up on glitter glue and fun foam, it is going to be a sparkly summer!

Join me in this cool kid's craft jewelry project. You know you could turn this into a bookmark if you don't want jewelry. But, who wouldn't want jewelry?

You need:

  • Fun foam: white for both, black for peace sign, purple for flower
  • Glitter glue: at least 3 colors of your choice
  • Busy Kid’s Camp Tropical Silky Cord
  • Toothpick
  • Hole punch
  • Printed patterns
  • pencil
  • scissors

Try this:

1. Trace circle pattern twice onto white fun foam. Cut out circles. Punch hole in top of each for necklace cord.

2. Draw spiral pattern on each using desired glitter glue colors. Use toothpick to comb back and forth through the glitter glue, blending it. Let dry.

3.

3. Trace peace sign onto black foam. Trace flower onto purple. Cut out.

4. String both pieces together onto 24” of cord. Tie knot in ends of cord.

Groovy and Glitter on!
Sparkle

Glittery Sun Visor Kid's Craft

Wednesday, June 2, 2010

Make your own sun visor, any color, and decoration, and full of sparkly goodness!


Here is what you need to make one:

  • Sheet of fun foam
  • Glitter glue colors of choice
  • 9 inch plate
  • 6 inch plate or bowl
  • pencil
  • scissors
Try this:


1. Trace 9” plate onto foam. Place 6” plate about ¾” from edge of larger circle. Trace.

2. Decorate as desired with glitter glue. Let dry.

3. Cut out.


Draw circles, lines, words, whatever you like. Make team or club visors!

Glitter on!

Sparkle

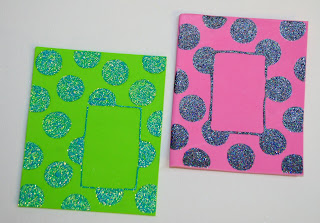
Glitter Fridge Magnet Frame Kid's Craft

Tuesday, June 1, 2010

Crafting is good, but crafting something that can actually be used is great!


To make magnet fridge frames with your kids, you need:

  • 5” x 6” piece of fun foam: pink
  • 6” x 7” piece of fun foam: black
  • 2” x 3” piece of paper
  • glitter glue: black magic
  • pencil/ruler
  • scissors
  • quarter
  • self adhesive magnet strips
(Change foam and glitter glue colors as you wish)

Try this:

1. Trace paper rectangle where desired on pink fun foam. Trace quarter as many times as desired on background.
2. Glue pink foam to center of black foam.
3. Fill in circles with black magic glitter glue. Let dry.

4. Place 3” magnet strips on back of frame at top and bottom edges. Adhere 2” x 3” photo in unpainted rectangle.

Fill the fridge with a photo gallery of glittery frames.

Glitter on!
Sparkle

Related Posts with Thumbnails