Blog Hop: Scallop Box Purse

Tuesday, March 30, 2010

WooHoo, I am doing my first blog hop! The blog hop is sponsored by Sizzix and put together by Eileen Hull, who has also designed the ScoreBoard Die we all used for today's project. Check out her website to vote for your favorite project! There will be prizes for the winning designers.


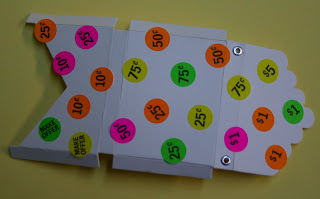
In a blog hop, all of the participating designers use the same product. For this project we all used the Sizzix ScoreBoard Scalloped Box Die. In addition, we had a challenge for the project. It was to use something from the office supply store. Fun! I used garage sale stickers, check it out.

These dies are soon-to-be-released. So , while you are waiting, get some ideas from the blog hop, gather your materials and be ready.

You need:
  • the Scalloped Box and two flowers (mine is cut out of white matboard)
  • fine glitter: turquoise, pink, orange
  • 2 tiny crystal gems
  • white craft glue
  • double sided tape
  • the garage sale stickers
  • a smallish flat paintbrush
  • about 10" of craft wire
  • assorted beads to go on the wire
  • 2 eyelets and a setter
  • wire cutter, round nose pliers
Try this:
1. Set the eyelets in the top panel at the ends.

2. Press stickers wherever you want white dots.

3. Brush glue to cover box. Do not cover the dots completely. I tell you this from my experience and I could not find the dots after I glittered! Crazy! Sprinkle turquoise glitter over the box. Shake off the excess. Remove the dots. Carefully.

Glitter one flower pink and one orange. Let everything dry.

4. Use the double sided tape on the flaps to assemble the box. Use white glue to glue flowers to the front. Also glue the gems in the flower centers. Let dry again.

5. Around one jaw of the round nose pliers, form a couple coils in one end of the wire. String the wire through one eyelet, from the underside. String the beads on the wire. String the end of the wire through the other eyelet from the outside to the inside. Make a few coils, trim off the rest of the wire.

Cute purse! It would be so cute to use to deliver a party invitation. What other ideas do you have for its use??
Check out all of the other designer's blogs and projects. Both the designers and the projects are amazing!

Glitter on!
Sparkle


Sea Shell Necklace

Friday, March 26, 2010

Today, we have a guest post by my friend Imaginina, direct from the beach. Nobody is quite as adventurous as Imaginina!


Hi from the beach everyone! Having a wonderful time, wish you were here. I am enjoying myself watching these crazy Floridians wearing winter coats on the beach. I hope you enjoy the necklace I made. If you are not at the beach like I am, you can cheat and buy a shell at the craft store.

I wanted to decorate the shell on both sides. Here is what I did on the inside:
  • Using some kind of decoupaging medium, coat the inside of the shell. I used gel medium. I love it.
  • See that my shell has a natural hole in the top? I picked it off the beach for that reason. You can drill one if you can't find one with a hole already.
  • Press some pieces of paper into the gel medium. I used some that kind of look like mermaid scales. Brush a coat of gel medium over the paper. Let it dry.
  • On the top of the shell, brush a coat of Crystal Sparkle...Sparkle 21. Pretty. Let it dry.
  • I added a paper word and a half pearl to the mermaid paper. I used gel medium to do that too.
  • Hang the dried shell from a chain or a cord. I wire wrapped a piece of wire as the hanger.
Looks great on the front and on the back!

If you have several tiny shells, you could do the same and add them to a charm bracelet. Everyone will be jealous!

Imaginina

Spring Flowers Cap

Thursday, March 25, 2010

My friends Imaginina and her Boss made a trip to the beach this week. Before they left, I made them a glittery hat to take and wear. Since it is spring...in most places, anyway...I made giant flowers with gem centers using Sparkle 21 and Sparkle Gems. They really shine when the sun hits this hat. It is an easy pattern that you can freehand. That makes it fast! Try it,


You need:
a denim hat, I got this one at my local craft store for $2.99!
Sparkle 21": Lavender Sparkle, Pina Colada Sparkle (or choose whatever colors that are calling out to you)
8mm round Sparkle Gems: ambers

Try this:
1. Make a big squiggly circle of Sparkle 21. Make a smaller one inside. Make a filled in center.

2. While it is wet, set three gems into the center.

3. Keep doing that all over the cap, alternating colors. Let it dry overnight and take it out for a test spin!

Add a few leaves if you want to, more color never hurts me!
Glitter on,
Sparkle

Glitter Flip Flops Chapter 2

Thursday, March 18, 2010

It was a flip flop party tonight in the studio. Some of my pals sat with me and added gems and Sparkle 21 to flip flops.


Cute. Easy. Permanent. Go here for a video tutorial so you can do it yourself.


Glitter on!
Sparkle

Earrings by Imaginina

Wednesday, March 10, 2010

My friend Imaginina stopped by the studio last week and I gave her the analogous color button challenge. She is very creative and has epic craft skills. I talked her into sharing her quick and easy project with us. Introducing....Imaginina!


Hello everyone, so glad to be here! This truly was a quick and easy pair of earrings. Even if you live under a rock and have never crafted before, you can handle this project. Give it a try.

You need:
  • 2 triangle shaped buttons
  • Glitter Sample Pack
  • white craft glue
  • 2 big jump rings (big enough to reach one of the button holes)
  • 2 fishhook earring findings
  • chain nose pliers
Make the earrings:
1. Choose your three analogous colors of glitter...see Sparkle's tutorial on that.
2. Squeeze the glue right from the bottle to cover approximately the bottom third of one triangle button. Shake one color of glitter to cover wet glue.
3. Repeat to cover center of button with another of your colors of glitter.
4. Repeat to cover top third of button with last glitter color. Set aside to dry.

Keep in mind that this is a craft not an arithmetic problem, just estimate the thirds as you are applying glitter.

5. Repeat for the other button.
6. Assemble the earring. Using pliers, twist the jump ring open far enough to put an open end through a button hole. String a fishhook finding on the open jump ring. Close the jump ring, getting the ends to touch. Repeat with other earring.

You could make a bunch of these at one sitting. Also think about seasonal earrings and make them in Christmas colors or red/white/blue. Dust off your creativity and forget the analogous color thing, just go for it.

Imaginina


Sparkling Pitcher and Glasses

Saturday, March 6, 2010

Hop on over to Think Crafts! today to check out my guest post on decorating a pretty pitcher with matching glasses. It is one of those projects that does not require patterns or thinking, you just have to draw circles. Nice.


Glitter on!
Sparkle

Button Art, a Color Lesson, and a Giveaway!

Wednesday, March 3, 2010

I made this button wall art today with a $1 frame from the dollar store and a bunch of stuff from my craft stash. Bet you can too!


Here is what you need:
  • frame, mine is 5"x5"
  • 9 buttons, the same diameter
  • Glitter Sample Pack
  • white craft glue
  • scrapbook paper and acrylic paint to match
Try this:
1. Take the frame apart. Trace and cut out a piece of paper the same size as the frame backing. Glue the paper to the frame backing. Put aside the glass. We will think of something to do with it later.

Paint the frame. If you like the color it is when you buy it, skip this step and you are one step ahead of me.

2. Place the backing in the frame.

3. Lay out your buttons to see how they fit.


Here is your color lesson! Designers sometimes work with a color wheel to select colors. You have probably used one in art class sometime in your art career. You know the primary colors are red, blue and yellow. Check out where they are on the color wheel. The secondary colors are orange, purple and green. See where they are. Today, we are using analogous colors. Analogous colors are next to each other on the color wheel. On the wheel above, you see I am showing aqua, green, and lime as analogous colors. Any set of colors that are next to each other are analogous. The sample pack is laid out much like a color wheel. You can select three colors next to each other and they will be analogous. I have chosen fucshia, pink and purple for my button colors.

An analogous color palette will always work.

4. Using a flat brush, a craft stick, or your finger, cover the sides and top of a button with glue. I had this pair of skinny needlenose pliers on my table and they worked PERFECTLY to hold the button while I worked. Don't you love it when that happens?

5. Sprinkle glitter over the wet glue. Slip it off the pliers and set aside to dry.

6. Glitter your nine buttons. I did three of each of my analogous colors. Glue them onto the frame backing. Let them dry before standing up or hanging up.

Pretty cute for $1, if I do say so myself!!!

And now, the promised GIVEAWAY!

The first three people who email me (sparklstudio@aol.com) a pic of the buttons they will use to make a glitter button project, will receive a free glitter sample pack!

Get out the button box.
Glitter on!
Sparkle

Glitter Daisies, Chapter 2

Tuesday, March 2, 2010

I liked yesterday's daisy so much it made me think we needed a home dec glitter daisy. So, I made three wall art daisies.


You need:
  • 3 silk daisies (color of your choice, I bought this bush at the dollar store for $1)
  • 3 surfaces (use small canvases or pieces of cardboard, I found some tiles at the dollar store)
  • black scrapbook paper
  • white craft glue
  • glitter to match your daisies
Try this:
1. Cut a piece of scrapbook paper the same size as the tile. Glue it on the front of the tile. Do this for each piece you are making.

This is why I liked the tiles for $1. They already had hangers on the back.

2. Cut the stems on the back of the daisies as close to the flower as you can.

3. Glitter the flower petals just like yesterday's project.

4. Make as many as you like. Three of them look nice hanging together.

So sparkly. So easy.

Glitter on!
Sparkle

Grab a Pen-Take Notes!

Monday, March 1, 2010

Today is the first day of National Craft Month 2010. I spent an hour at the dollar store looking for inexpensive glitter crafting project ideas. You'll want to take notes...with this fabulous glitter daisy pen.


You need:
  • a pen (10 cents each at the dollar store)
  • a daisy (this bush was $1, you can't beat it!)
  • floral tape ($1 for two rolls!)
  • white craft glue
  • glitter, I used Pink Diamond Dust over the hot pink daisy
  • wire cutters
Try this:
1. Cut the stem of a daisy to about 1 1/2".

2. Remove the plug at the end of the pen. Stick the stem down inside the pen. Add some glue where the stem meets the pen.

3. Using a small brush or a craft stick or your finger, put some glue on a couple petals. Don't be stingy with the glue!

4. Sprinkle glitter on the wet glue. Repeat until all of the petals are glittered that you wish to be glittered.

5. Wrap floral tape from the daisy all the way down the pen. I stop short of the end because the floral tape gets sticky from holding it, when using the pen.

6. Be happy, it is so glittery!

Come back for more fun projects in honor of National Craft Month.

Glitter on!
Sparkle

Related Posts with Thumbnails