Tuesday, March 30, 2010

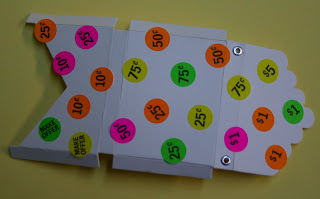
In a blog hop, all of the participating designers use the same product. For this project we all used the Sizzix ScoreBoard Scalloped Box Die. In addition, we had a challenge for the project. It was to use something from the office supply store. Fun! I used garage sale stickers, check it out.
These dies are soon-to-be-released. So , while you are waiting, get some ideas from the blog hop, gather your materials and be ready.
- the Scalloped Box and two flowers (mine is cut out of white matboard)
- fine glitter: turquoise, pink, orange
- 2 tiny crystal gems
- white craft glue
- double sided tape
- the garage sale stickers
- a smallish flat paintbrush
- about 10" of craft wire
- assorted beads to go on the wire
- 2 eyelets and a setter
- wire cutter, round nose pliers
 Try this:
1. Set the eyelets in the top panel at the ends.
 3. Brush glue to cover box. Do not cover the dots completely. I tell you this from my experience and I could not find the dots after I glittered! Crazy! Sprinkle turquoise glitter over the box. Shake off the excess. Remove the dots. Carefully.
Glitter one flower pink and one orange. Let everything dry.
 4. Use the double sided tape on the flaps to assemble the box. Use white glue to glue flowers to the front. Also glue the gems in the flower centers. Let dry again.
 5. Around one jaw of the round nose pliers, form a couple coils in one end of the wire. String the wire through one eyelet, from the underside. String the beads on the wire. String the end of the wire through the other eyelet from the outside to the inside. Make a few coils, trim off the rest of the wire.
 Cute purse! It would be so cute to use to deliver a party invitation. What other ideas do you have for its use??
 Check out all of the other designer's blogs and projects. Both the designers and the projects are amazing!
 Glitter on!
Sparkle
Carla Schauer
Cindi Bisson- Fat Cat Creations
Craftside-A behind-the-scenes peek at a crafty world
Designs by Roxi
Eileen Hull
Jenn Ellefson
Just a Thought or Two
Jen Goode
Julie McGuffee
Karen Burniston
Laura Bray
Lisa Rojas
Marisa Pawelko- Modern Surrealist
Melony Bradley
Michelle Cummings
Niki Meiners
Pink Lemonade
Sandy Laipply
Sparkle Studio
Veronica Goff


17 Comments:
I like how you used stickers to create the dots! Very Clever! I just added my post, hope you can add me to your link list!
great techniques and I love the end result!!
Margot- so creative- thanks for the pictures- I was wondering how you did the neat circles and glitter effect! Very cool
Lovin' the step-outs! Great idea for masking polka-dots.
So smart! Love your masking technique and the whole sparkly fun-ness (is that a word?) of your project!
Polka dots AND glitter? What more could a girl ask for? I love it!
Too Cute! Your idea to make the poka-dots... brilliant!
This is great! I love how you used the stickers for your masking! Totally fun!
Love the glitter. Very cute.
Love how you used the stickers as masks! Clever way to incorporate the office supplies!
Love the polka dots and the "sparkles".
So very, very cute!
Kim I could swear I wrote you a comment- where did it go? Told you it was glittericious! Love the idea of totally covering this in sparkles! Thanks for joining in :-)
Beautiful! Love the handle!!
Fantastic use of garage sale stickers!! Love the glitter...really really love all the glitter!! Love the idea of it housing an invitation!!
Very cute design! Loving it!
Another FUN use for my burgeoning bead stash, shaped stickers and glitterati!
Sending out invitations brings out your creativity. With this idea, you can do your own variations. Another design you can do is glitter stripes. Instead of using dots, you can use shredded strips (for shredding: http://www.texas-shredding.com)of paper after laying it on the card board do the same steps from brushing with glue and putting on glitter then remove the paper strips.
Post a Comment