Sparkle's Good Things Come in Small Packages - Sizzix BlogHop

Tuesday, April 27, 2010

This is chapter 3 of the current blog hop in the current Sizzix blog hop. The blog hop is sponsored by Sizzix and put together byEileen Hull, who has also designed the ScoreBoard Die we all used for today's project.


This rectacngle box is just the right size to put a bracelet or pair of earrings in to give as a gift. Two gifts in one!

To make this cute little box, you need:
  • the Sizzix Scoreboards rectangle box die
  • matboard to make the pieces
  • acrylic paint: I used Folk Art Magenta
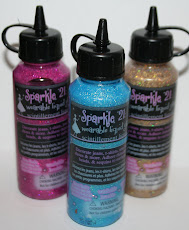
  • Sparkle 21: Limeade Sparkle
  • flat paintbrush
  • 2 sided tape
  • lime green rick rack
  • 3 small brads
  • 2 small magnets or a bit of velcro (self adhesive)
Try this:
1. Lay the pieces flat on your work surface, paint both sides. Let dry.
2. Using Sparkle 21, draw some curlicues and add a few dots. Let dry.
3. Put the brads in the three holes in the back to hold the lid to the box.

4. Use double stick tape on the box flaps. Build the box.
5. Stick the magnets or velcro under the point of the lid to keep the lid closed.
6. Tie rick rack in a bow around box.

As usual, several talented designers are participating this week. Check out their projects, they are amazing!

Glitter on!
Sparkle

Pretty Shower Decorations

Monday, April 26, 2010

Blog friend Owen's Grammy threw a bridal shower this weekend. She made fabulous table decorations and agreed to let me post them for you to see.


Cute, right? I love the combination of sparkle and organic.

Love love love this bird ornament!

OH! Sprinkles = edible glitter.

Does it give you ideas?
Glitter on!
Sparkle

Photo Display Hanger

Friday, April 23, 2010

Don't I know some cute boys? Here is another way to display a photo that is super fast and easy. You probably have some of these wooden pant hangers in the closet like I did. I found all of the other pieces in my stash, so that made this a free project. Use whatever you have on hand to design your own.


You need:
  • wooden pant hanger
  • Big & Glitzy Glitter Glue: 2 colors, I used Garnet and Peacock
  • acrylic paint, I used a bright lime green color
  • flat paintbrush
Try this:
1. Paint the front panel of the hanger. You can paint the whole thing, but painting the front works, and is fast. Let the paint dry.

2. Alternating colors, draw squares on the front of the hanger with Big & Glitzy. Put the opposite color dot inside each square. Let dry.


That's it! Now clip whatever you want to display into the hanger. I used a piece of scrapbook paper for a background. I had some letter stickers that I stuck to the paper. And I found a book of quotes that I did not remember I had, so I used a page from it. You could clip several pics on it.

Have fun designing! Then just hang it up.

Glitter on!
Sparkle

Sparkling Clipboard

Thursday, April 22, 2010

This project was so fast and easy. Honestly, I think I finished it in 60 seconds! Want one?


Here is what you need:
  • small clip board (I bought this one at the dollar store. Isn't it pretty?)
  • Mod Podge
  • fine crystal glitter
  • flat paintbrush
  • your photo
All you have to do is brush a coat of Mod Podge over the clip board and sprinkle the glitter over it. The thicker you can make the Mod Podge, the more glitter will stick.

Let it dry and clip your photo to it.

This would be a great Mother's Day gift for Mom for any Mom or Grandma. Since the clipboards are so inexpensive, they would make a nice wall statement if you make 3-5 and hang them together.

Glitter on!
Sparkle

Daisy Pen

Friday, April 16, 2010


Spring! Don't you love it? While I was in the studio yesterday, I was having a raging case of spring fever, and it came out in this project. You might have made a pen similar to this already, it is an idea that has been floating around for awhile. I just added glitter. Of course!


Here is how to do it for yourself.
You need:
  • a ballpoint pen
  • a silk flower
  • white craft glue
  • wire cutters
  • small flat brush (optional)
  • green floral tape
  • glitter of your choice ( I used big crystal holographic glitter)
Try this:
1. Cut the stem of the silk flower to about an inch. Take the end off the pen and stick the flower stem into the barrel.

2. Add glue inside the barrel and around the stem and barrel. Let the glue dry.

3. Cover the top of a petal with white glue. I use my finger, but you can use a small flat brush. While the glue is wet, sprinkle glitter over it. Shake off extra.

Do as many petals as you wish to be glittered. My flower has two layers, I did them both.

4. When the glue is dry, wrap floral tape around pen. This is for looks only, it makes the pen look like a stem.

Have fun, go crazy! Make pens!

Glitter on!
Sparkle

Blog Hop: Tea Cup

Tuesday, April 13, 2010

This is chapter 2 of the current blog hop in which I am participating. The blog hop is sponsored by Sizzix and put together byEileen Hull, who has also designed the ScoreBoard Die we all used for today's project.


For this second project we all used the Sizzix ScoreBoard Tea Cup Die. A special challenge was added. If we chose to accept the challenge, we were to choose one of these color palettes suggested by Brenda Pinnick. I went with palette #2.

To make the tea cup, here is what you need:
  • the tea cup die
  • acrylic paint (I used Folk Art Aqua and Bayberry)
  • Big & Glitzy Glitter Glue: Peacock, Sapphire, Coral
  • 1/4" double stick tape
  • medium flat paintbrush
  • #2 pencil
  • straight pin
  • 6" of string or yarn
Try this:
1. Fold on the scored lines. Apply the double stick tape on the flaps.

2. Stick the front and back tea cup shape to the center section.

3. Paint the inside of the tea cup Aqua.

4. Paint the outside of the tea cup Bayberry.

5. With pencil, freehand or trace a curlicue pattern across the front of the tea cup.

6. Apply sapphire to the curlicues. Squeeze a big dot of peacock opposite each curlicue. Stick the straight pin in the center of the dot, and draw outward to form a leaf. Add a small dot of coral next to each leaf. Make a heart on the tea bag tag. You can easily do that by squeezing out two dots of coral, right next to each other, and dragging the pin down through the center. Let everything dry until it sparkles.

7. Tie the yarn to the tea bag tag. Tape to the inside of the cup. Assemble parts with double stick tape as shown.

I have a friend who is on overload right now. I think I will give this to her, in hopes she will find some time to sit down and have a cup of tea.

This would be a great teacher gift or party/shower favors. You can change the tea bags for anything that will fit inside.

And of course, check out all of the other participating designers and their amazing blogs!

Glitter on!
Sparkle

The Better to See You With

Thursday, April 8, 2010

Today I saw a pair of glasses with gems all around the frames and I wanted them! But, the price was embarrassing. So, I hopped over to the dollar store and bought this pair of blue cheater glasses. For #1. Ha!


You should do this. You don't even need instructions. Just put some Sparkle 21 around the frames and set Sparkle gems in while wet. Now, mine are better than the expensive ones because they not only have gems, they have glitter! And they only cost $1.

You could make them in every color!
Glitter on!
Sparkle

Spring Birdies Have Glitter

Tuesday, April 6, 2010

This is the easiest, fastest project ever. Ever! I think we are all smiling at the things of spring right now. Make this!


You need:
  • a bird ( I found this painted wooden one at the craft store, isn't he cute?
  • white craft glue
  • medium flat paintbrush
  • Glitter Sample Pack
  • a stick from the yard or the park
Try this:
1. Brush a little glue where you want to accent with glitter. Sprinkle glitter over wet glue. Make your bird any colors!
2. Place stick on table or centerpiece. Perch the bird next to it.

Honestly, it took me longer to find stick than it did to glitter the bird.

If you added a few more birds, wouldn't this be the cutest table centerpiece?

Glitter on!
Sparkle

Related Posts with Thumbnails